Gitlab⚓
Introduction to Gitlab⚓
GitLab is a web-based Git repository that provides free open and private repositories, issue-following capabilities, and wikis. It is a complete DevOps platform that enables professionals to perform all the tasks in a project—from project planning and source code management to monitoring and security. Additionally, it allows teams to collaborate and build better software.
(source: https://www.simplilearn.com/tutorials/git-tutorial/what-is-gitlab)
Depending on the context, we will use either :
This is the Gitlab homepage after your first connection. On the left, you can see the menu from which you can access all Gitlab functionalities.

Creating and Managing Projects⚓
Create a project⚓
The first step on Gitlab, is to create a project :
 From the left menu:

Without particular needs, choose Blank Project:

Configure your new project, then click on Create project:

You can change the visibility of your project:
- Private
- Internal
- Public
You can change the visibility afterward if needed.
You can choose to add a README file. It depends on the context. If you are starting to work on your project you can add one. If you already have a local git repository and you want to link it to your new Gitlab project, do not add a REAME.
The home page of your project, listing files (now only README.md), and its content below:

Clone your project⚓
If you have already setup SSH keys, you can use the Clone with SSH URL, if not, use the Clone with HTTPS URL as shown below.

Add members to a project⚓
From the left menu:

Then configure the role of your new member
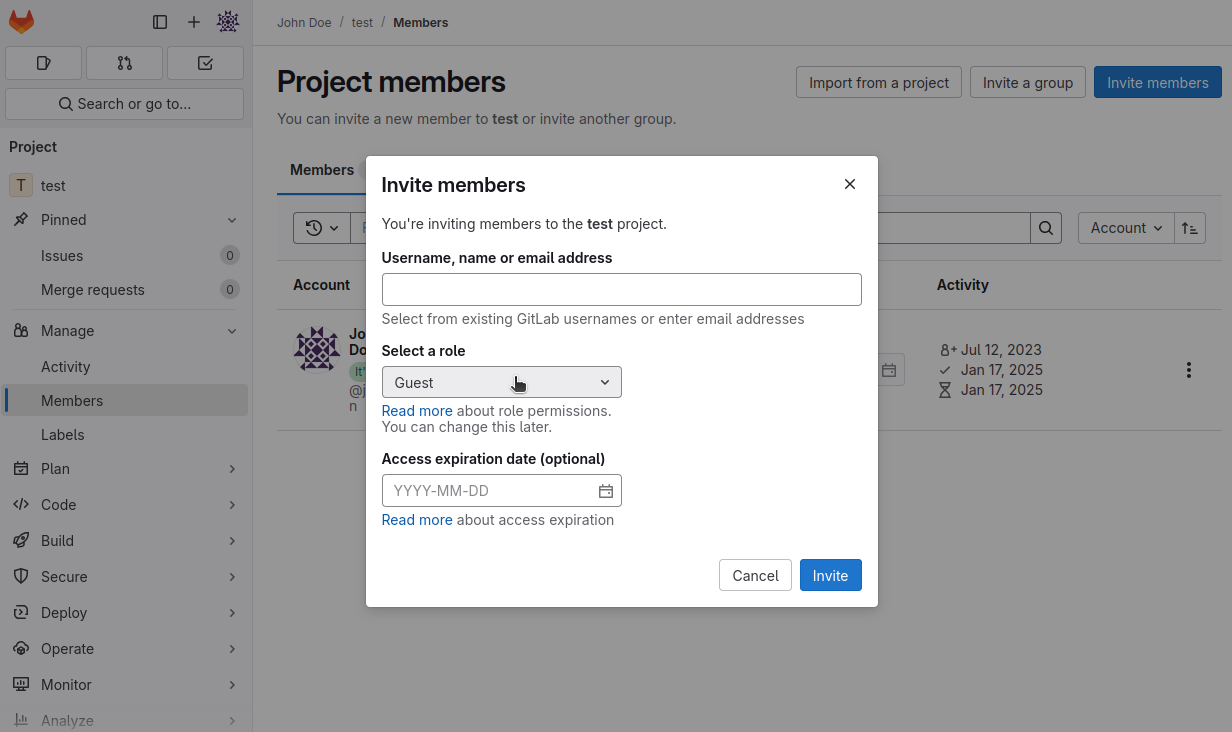
The roles are (summarized by chatgpt):
|
Role name |
Role summary |
|
Guest |
Limited access to a project or group |
|
Planner |
A custom role (if applicable in your instance of GitLab) focusing on project management tasks |
|
Reporter |
Read-only access to code with permissions to create and view issues |
|
Developer |
Full contributor to the codebase, suitable for team members actively working on |
|
Maintainer |
High-level access for managing the project or group |
|
Owner |
Highest level of permissions |
To see all the different roles permission, have a look on: https://labs.etsi.org/rep/help/user/permissions.md#project-members-permissions
Create a group⚓
Groups are useful to regroup several projects together, to easily manage them. Permissions are inherited downward, meaning a permission accorded to a user by a group, is conserved by that user for everything this group contain (subgroups and/or projects).
Work to progress soon
SSH Keys for Gitlab Access⚓
Git is a distributed version control system, which means you can work locally, then share or push your changes to a server. In this case, the server you push to is GitLab.
GitLab uses the SSH protocol to securely communicate with Git. When you use SSH keys to authenticate to the GitLab remote server, you don’t need to supply your username and password each time.
(source: https://docs.gitlab.com/ee/user/ssh.html){target="_blank"}
Create SSH public/private keys pair⚓
There are different algorithms used to create keys. The more modern and secure one available on Gitlab is ed25519
1 | |
-t: define key type (do not change it without valid reason)-f: set the path and file name of the private key (optional but useful). The public key file name is the same plus a.pubextension.-C: embed a comment in the public key file
The command line will prompt you for a passphrase. Use a passphrase for highest security. Here, it is optional, you can left it blank.
More detailed documentation: https://www.ssh.com/academy/ssh/keygen
Now, you have a keys pair. In order to use it to interact with Gitlab, you have to add your public key to your Gitlab profile.
Add public key to Gitlab⚓
Go to Edit profile menu entry:

Go to SSH keys menu entry, and click on Add new key:

You will need the content of your public key file. Use the following command (change file name if needed):
1 | |
Copy that content into the Key field (here a dummy key for the example):
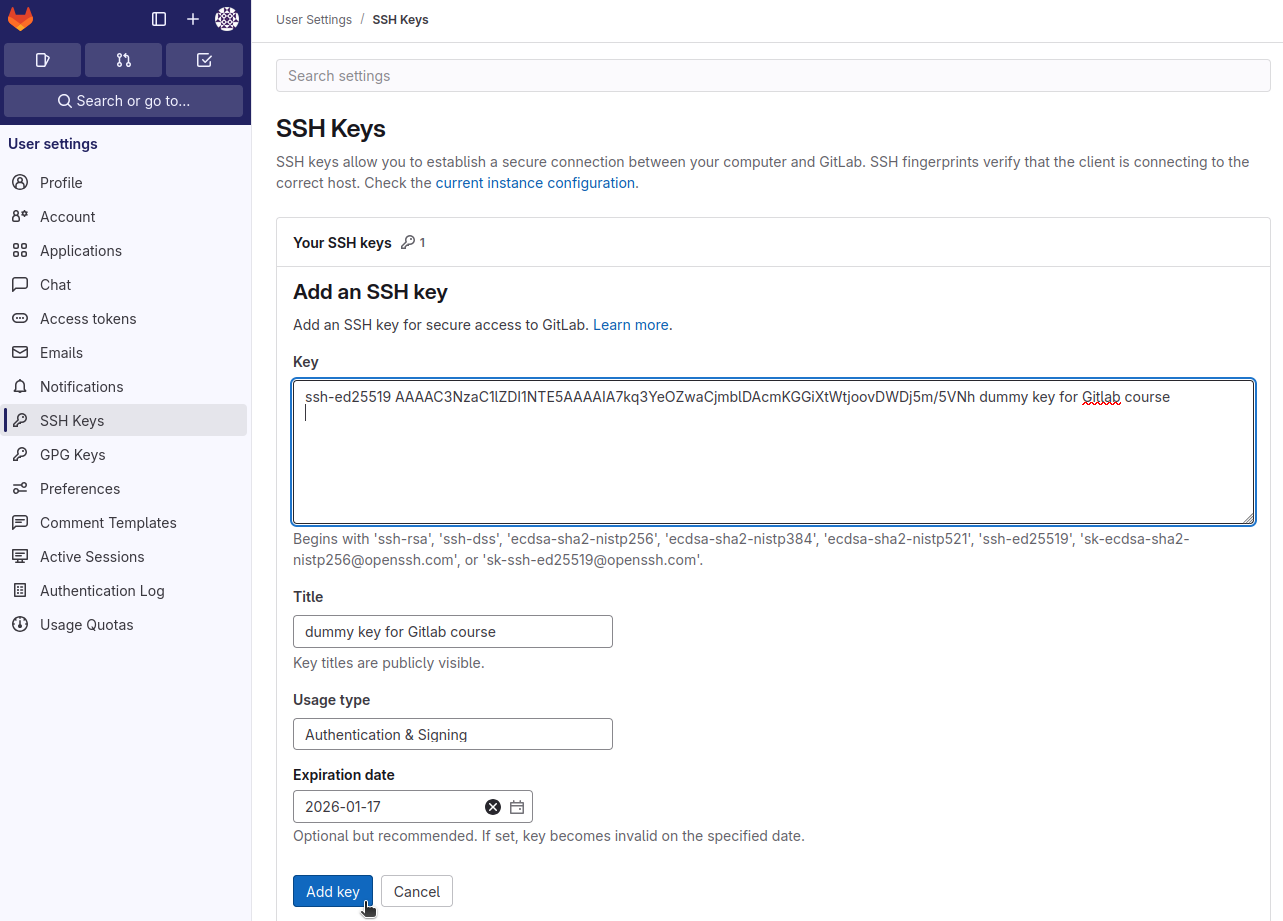
And click on Add key.
Note that the Title field is automatically filled with the comment provided with the -C option during the keys pair creation. You can also set an Expiration date for the key.
Now, if you did not use a pass phrase on your SSH key, you can clone/push/pull/fetch without using any password.
Danger
The private key is retained by the client and should be kept absolutely secret. Any compromise of the private key will allow the attacker to log into servers that are configured with the associated public key without additional authentication. As an additional precaution, the key can be encrypted on disk with a passphrase.
The associated public key can be shared freely without any negative consequences. The public key can be used to encrypt messages that only the private key can decrypt. This property is employed as a way of authenticating using the key pair.
Forks and Merge Requests (MRs)⚓
Forking a Repository⚓
- Forks are personal copies of a project
- Used for contributing without direct write access
From the repository index page top right corner:

You can create MR from your fork once changes are ready to be merged back to the original repository.
Note
You can see your project was forked from another repository on your new repository index page.

Merge Requests (MRs)⚓
MRs are GitLab’s pull requests:
- Create MR from your branch to the target (e.g.,
main) - Link issues, assign reviewers, write a clear description
From the repository page top left corner:

Note
When creating a MR to merge changes between different repositories (like merging changes upstream after a Fork), the MR can be created from the source repository for the merge or from the target one.
Select source and target branches:

Then you need to fill the MR form, before publishing it.
Afterwards, you can see the state of your MR (same as for the project maintainers).
🧪 As a project manager, you can enable pipelines to run tests on MRs (See Gitlab CI/CD)
Review Process⚓
- Comments and suggestions on MRs
- Approvals required (if configured)
- Resolve discussions before merging
✅ Ensure CI/CD, linters, and tests pass before merge

Protected Branches⚓
- Prevent force pushes or direct commits to critical branches
- Allow only certain users or roles to merge
Configure in:
Project → Settings → Repository → Protected branches

Examples:
- Protect
mainandrelease/* - Only allow Maintainers to push/merge
GitLab Issues: Tracking Work⚓
GitLab Issues are a lightweight way to track tasks, bugs, features, or ideas in a project.
They support:
- Markdown formatting
- Labels (e.g.,
bug,enhancement) - Milestones and due dates
- Assignees and mentions
- Task lists (checklists)
To create an issue, go to your project and click on Issues → New issue from the left menu.

Give your issue a title, description, labels (if any), and optionally assign it to yourself or a teammate.

Connecting Issues to Merge Requests (Optional)⚓
When working on code, you can reference or automatically close issues from your merge requests by mentioning them in the MR description or commit message:
1 2 3 | |
This creates a cross-reference between the issue and the code changes, which improves traceability.
Once the merge request is merged, GitLab will automatically close the linked issue if it was referenced with Closes, Fixes, or Resolves.
Tip
You can and often should create the Merge Request from your issue directly. It will then automatically link them on Gitlab.

It will also close the issue once the MR is accepted and resolved.

Best Practices⚓
- Use issues to define what needs to be done before you write code.
- One issue = one focused task or bug.
- Don’t overload issues with too many unrelated ideas — break them down when needed.